Destiny Buddy manual
List of contents
- First time using Destiny Buddy
- Settings
- Filter
- Card browser
- Inventory and card values
- Tags
- Collection statistics
- Proxy creation
- Deck editor
- Printable card creator
- Deck testing
- Trades
- Tradelist comparison
- Draft pack generator
- Custom set/card creation
First time using Destiny Buddy
When Destiny Buddy is launched and it does not find a saved settings file it will ask the user to either use some default settings or set the most important settings manually.
These settings are:
- where card images are stored
- where created data files are stored
- where automatically created backups are stored
- which currency symbol Destiny Buddy should show after monetary values
By default all the files are stored in the same folder where Destiny Buddy.exe is located in their appropriate subfolders. This is recommended but if you want to use Destiny Buddy on multiple computers it might be worth it to set the data and backup files to go into a folder that is stored in a cloud service (like Dropbox or Google Drive). The files will then be uploaded into the cloud whenever you make changes to them. All these settings can be changed afterwards.
After making the initial settings Destiny Buddy will download the card information from swdestinydb.com. Reading the file might take a moment but once it is done Destiny Buddy will load the default window layout.
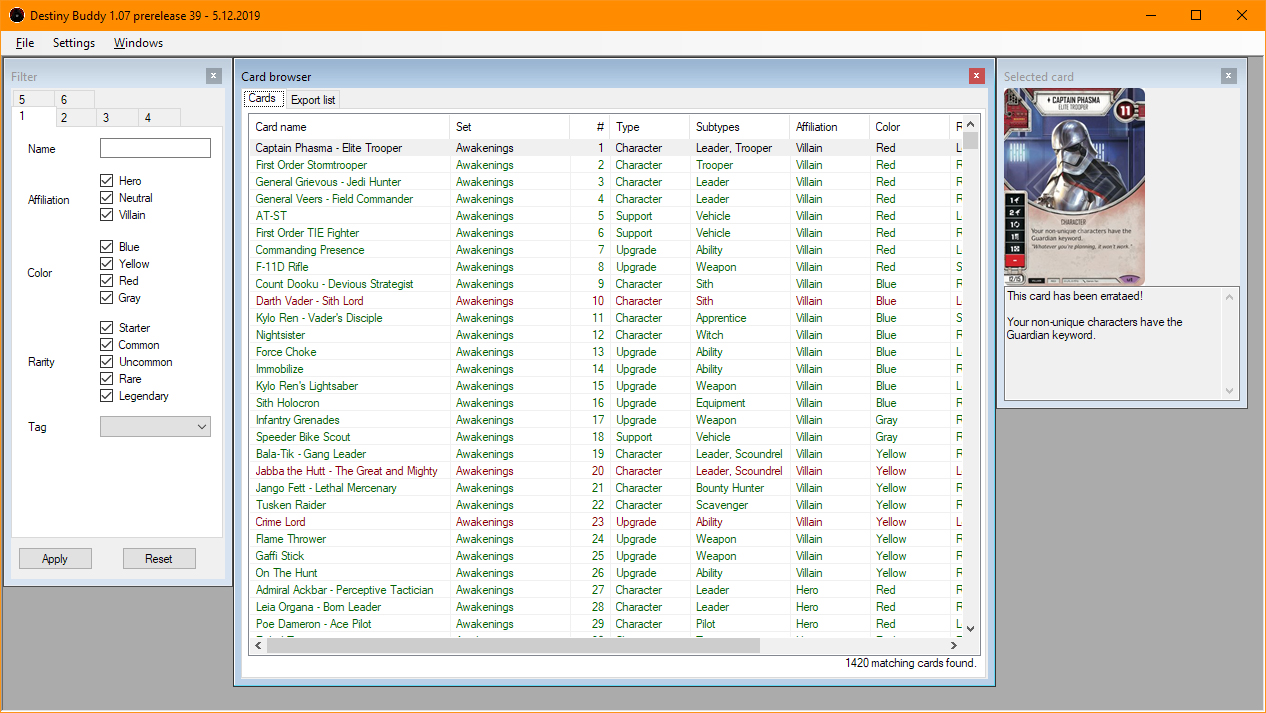
The leftmost is the filtering window which can be used to set filters on which cards you want to see listed in the card browser. The rightmost window will show which card you have selected.
The main menu allows you to manually save all the data files. Usually pressing this is not needed as all the changes are saved when Destiny Buddy is closed. Destiny Buddy will also keep track of changes that have not been saved in the case of electric outage or a crash.
Settings menu will open a settings window where all the settings can be changed. See more details under the settings information.
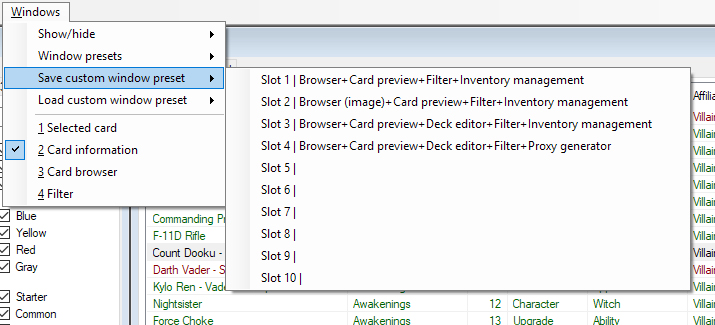
Windows menu allows you to open and close various windows, load some default window presets or save/load custom window presets. The presets will contain the following information about the windows:
- which windows are open
- size of the windows
- location of the windows
There is 10 different slots that can be used to save different window presets.
Settings
In addition to the settings chosen in the first-launch-settings-window the user can change which affiliations, colors or sets are checked in the filtering-form by default. For example it is possible to uncheck hero and blue if the user is creating a villain deck that can play red, yellow and gray cards. The sets that are checked by default can be changed to match the format the deck is created for. After these have been properly set hitting the reset-button in the filtering form will only check the appropriate affiliations, colors and sets.
Balance of the Force-tab allows you to set the used holocron and customize them. Holocrons can be used to change the rules text of cards or the point costs of characters. Holocrons also contain the restricted list and the information regarding the allowed sets. (Restricted lists and allowed set information are only used in the deck editor where a warning is shown if the deck violates the legal sets or restricted list in the currently used holocron.)
The holocron manager has a button that allows the user to download some basic holocrons from the website automatically.
Pdf-files tab allows the user to select which papersize is used when generating pdf-files. The options are A4, A3, Letter and Tabloid. It is also possible to select how much margin should be left blank in the edges of the pages or how much empty space should be left between different elements that are drawn in the pdf-file. (For example how much space should be left between different cards when making proxy cards.)
Filter
Use the filtering form to set your desired filters. The filters are located under multiple tabs due to space constraints.
Tab 1:
- name
- affiliation
- color
- rarity
- tag
Tab 2:
- card types and subtypes
Tab 3:
- rules text
- artist
- die
- card is(/is not) unique
- card's minimum and maximum resource cost (card's that have no resource cost are assumed to have a 0 cost)
- card's cost is odd/even
Tab 4:
- character's minimum/maximum health (non-characters are assumed to have 0 health)
- character's (or plot's) minimum/maximum point cost (card's without team point cost are assumed to have 0 cost)
- card is(/is not) owned or how many copies is owned
- how many copies is marked as being on the want-to-buy or want-to-sell -lists
- card is in open trades
- card is in open trades with a specific person
Tab 5:
- set
Tab 6:
- monetary value
For example if you want to see all the battlefields you own you should uncheck all the other card types in the tab 2, set the owned to yes in tab 4 and press apply. The card browser will update and only show all the known cards that are battlefields and you own at least one copy of.
Card browser
Card browser lists all the filtered cards and shows their information in multiple columns. The columns can be modified by clicking the header in the card browser. It is possible to select which information is shown and how wide the columns should be by default. It is also possible to select how the cards are sorted.
Card browser has two tabs named "Cards" and "Export list". The export list -tab allows the user to create a pdf-file that has the filtered card list and all shown columns listed. This can be used to print out various lists of cards. For example one could create a list that shows all the owned cards or all the cards they want to trade.
It is also possible to generate a csv file that separates all the fields with a ';' symbol. This can be used to export the shown cardlist into tools like Excel or Google Sheets.
Inventory and card values
Inventory management -form allows the user to set how many copies they own, want to buy or want to sell. The form can also be used to update the information regarding how valuable the cards are.
Generic value is the base value of the card. I'd suggest using it for the approximate actual value of the card. Buy and sell values are secondary card values which can be used to assign how much you are willing to pay for the card or how much you want for it when you're selling. Next to the buy and sell values are percentage values which can be used to automatically calculate buy and/or sell values when you update the generic value.
When mass updating is selected the next row in the card browser is automatically selected when the price is updated. This makes it easier to update the prices of all the cards in the card browser.
At the time of writing this manual there is no website that offers card prices in an easily readable list. Because of this the only way to update the card prices is to set them all by hand. As prices change all the time I'd advice rechecking all the values before any bigger trading takes place. To limit the amount of work it is probably worth it to only update the values for the legendaries and most commonly used rares and uncommons. Keep in mind that it is possible to select multiple cards in the card browser and then give them all the same value.
Tags
The user can change and modify the used taglist. A default taglist comes with the release of Destiny Buddy which can be copied or replaced by a user created one.
When a user-created taglist is being used it is possible to make new tags or delete old ones in the Available tags -tab. Cards can be assigned tags in the Card tags -tab. Select one or more cards in the browser and check all the tags you want to assign to the selected cards.
In the filter form it is possible to select a tag that the cards must have. By assigning tags and using the tag-setting in the filtering form it is possible to list some specific cards. For example it would be possible to copy the default taglist and add favourite tag to all the most commonly used cards to make finding those cards easier when one is making a deck.
Collection statistics
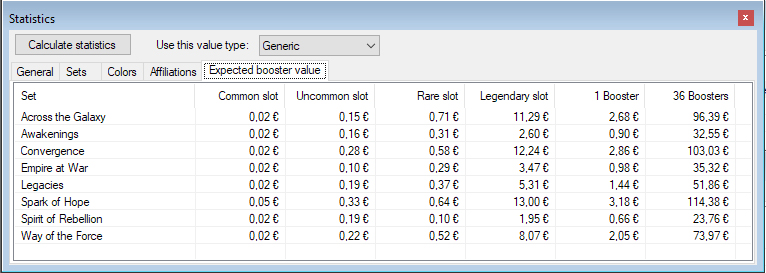
Statistics-window shows various statistics about your Star Wars Destiny card collection. The form also calculates the expected values for boosters of different sets based on the values you have set to the cards. Please note that for this information to be of any use you have to manually give a value to each card. The less specific you are the less reliable the pricing statistics are.
Proxy generator
Destiny Buddy can generate pdf-files with properly sized cards to be printed. To create proxy cards or proxy dice select the card(s) in the card browser and add them to the list in the proxy generator. It is possible to change the size of the printed cards. Once Destiny Buddy has generated the pdf-file it can be printed. When you print the pdf make sure your pdf-reader does not scale the pages or the printed cards might be wrongly sized. (The used paper size can be changed in the settings-window.)
Collection placeholder cards are cards that contain information of the cards in a clean format. The cards can be cut and placed in binders to represent where a card should go once you obtain it. By default these cards are slightly smaller than the proxy cards to make it easier to slide them into the binder pockets.
When making proxy dice Destiny Buddy has two options regular and simpler design. The regular design roughly tries to create similar looking dice pictures as in the actual dice. A specific portion of the card pictures are used as the picture and the numbers and symbols are located roughly in the same place as in the real Star Wars Destiny dice. The simpler design abandons the pictures entirely and only the card's set and card's number in set are printed on each side of the die. The size of the round image can be changed to match the size of the dice the user has at hand to glue the printed images into.
Deck editor
When the deck editor is opened it will show a deck selection screen. In this screen you can create a new deck or open an existing deck. It is possible to filter the list of decks based on the marked status of the decks, what format the deck is for or what character must be in the deck.
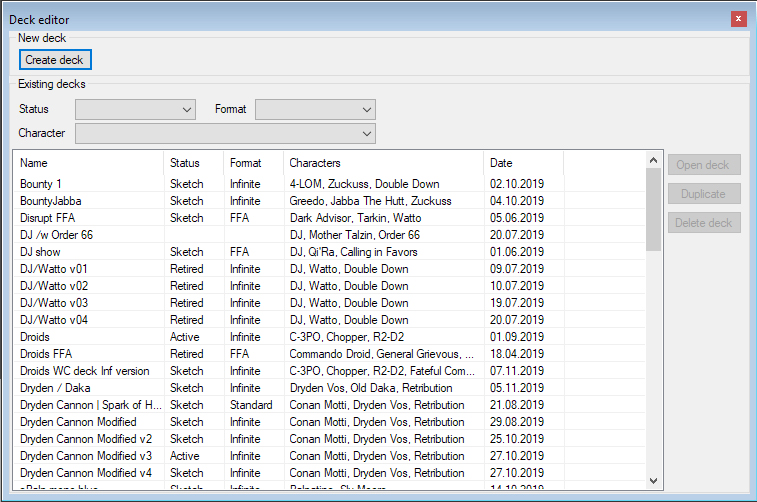
When creating a new deck the deck must be given a name and a filename. Both of these must be unique.
Once a deck has been opened the deck editor will view the deck's cardlist in the middle of the window. Characters, battlefields and plots are always listed before the cards in deck. It is possible to select which columns of information are shown by clicking the headers in the table.
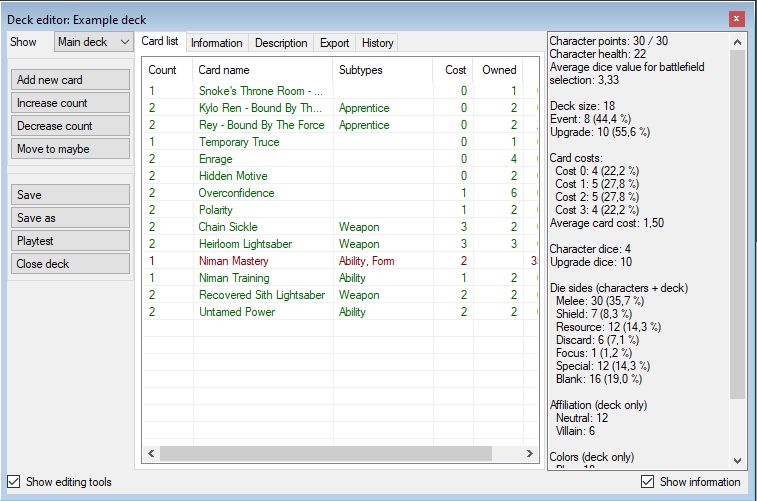
On the left side of the editor the buttons can be used to add or remove the cards into the deck. There is also a dropdown list which can be used to view a maybelist or a set aside -list. To add a card into the deck make sure "Main deck" is selected and then select the card you want to add either in the deck editor's cardlist or in the card browser. After you have selected the card press "Add new card". If you want to make a character elite, select it in the deck editor's cardlist and click "Increase count" -button.
On the right side of the editor a list of warnings about your deck might be shown if it violates some deckbuilding rules. Destiny Buddy does not understand if some cards modify these rules so they might be false warnings at times. For example Leia - Boushh allows you to play 5 villain cards in a hero deck so the deck editor would give a false warning about mixing hero and villain cards in a deck even though your deck is legal to play. The warnings can be hidden by clicking the "Hide warnings" text below the warnings.
Below the warnings some statistics are shown about the currently open deck.
Maindeck, maybelist and set aside -list
Maybelist can be used to save some cards that might be worth playing in the deck. Cards on the maybelist are not considered to be part of the deck. For example the maybelist could be used when you go through all the different cards and then add anything that seem even remotely playable. Afterwards when you're editing your deck you can recheck the maybelist to see if any of the cards would be better than what you have added into your deck.
Set aside -list contains cards you might need when playing the deck. They are given easy access when playtesting the deck and they are also listed in printable cardlists after the maindeck's cards to remind you to bring those cards along with your maindeck. For example if you play Megablaster Troopers in your deck you might want to add First Order Stormtroopers on the set aside -list.
Information and Description -tabs
Below the information tab it is possible to edit the following information about the currently open deck.
- deck name
- last time the deck was edited
- what format the deck is for
- what is the status of the deck
Below the description tab it is possible to write some notes or commentary about the deck. For example one could write a change history or playing results in the description.
Exporting deck
In the exporting deck -tab it is possible to export the deck in 3 different ways:
- Plain text - Copies the decklist in a plain text format into the clipboard.
- Printable card - Opens the pdf-card creator and copies the deck's contents into the currently open card. Once the pdf is created it is possible to print it and cut the decklist so it can be easily carried with your deck.
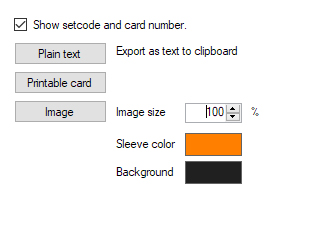
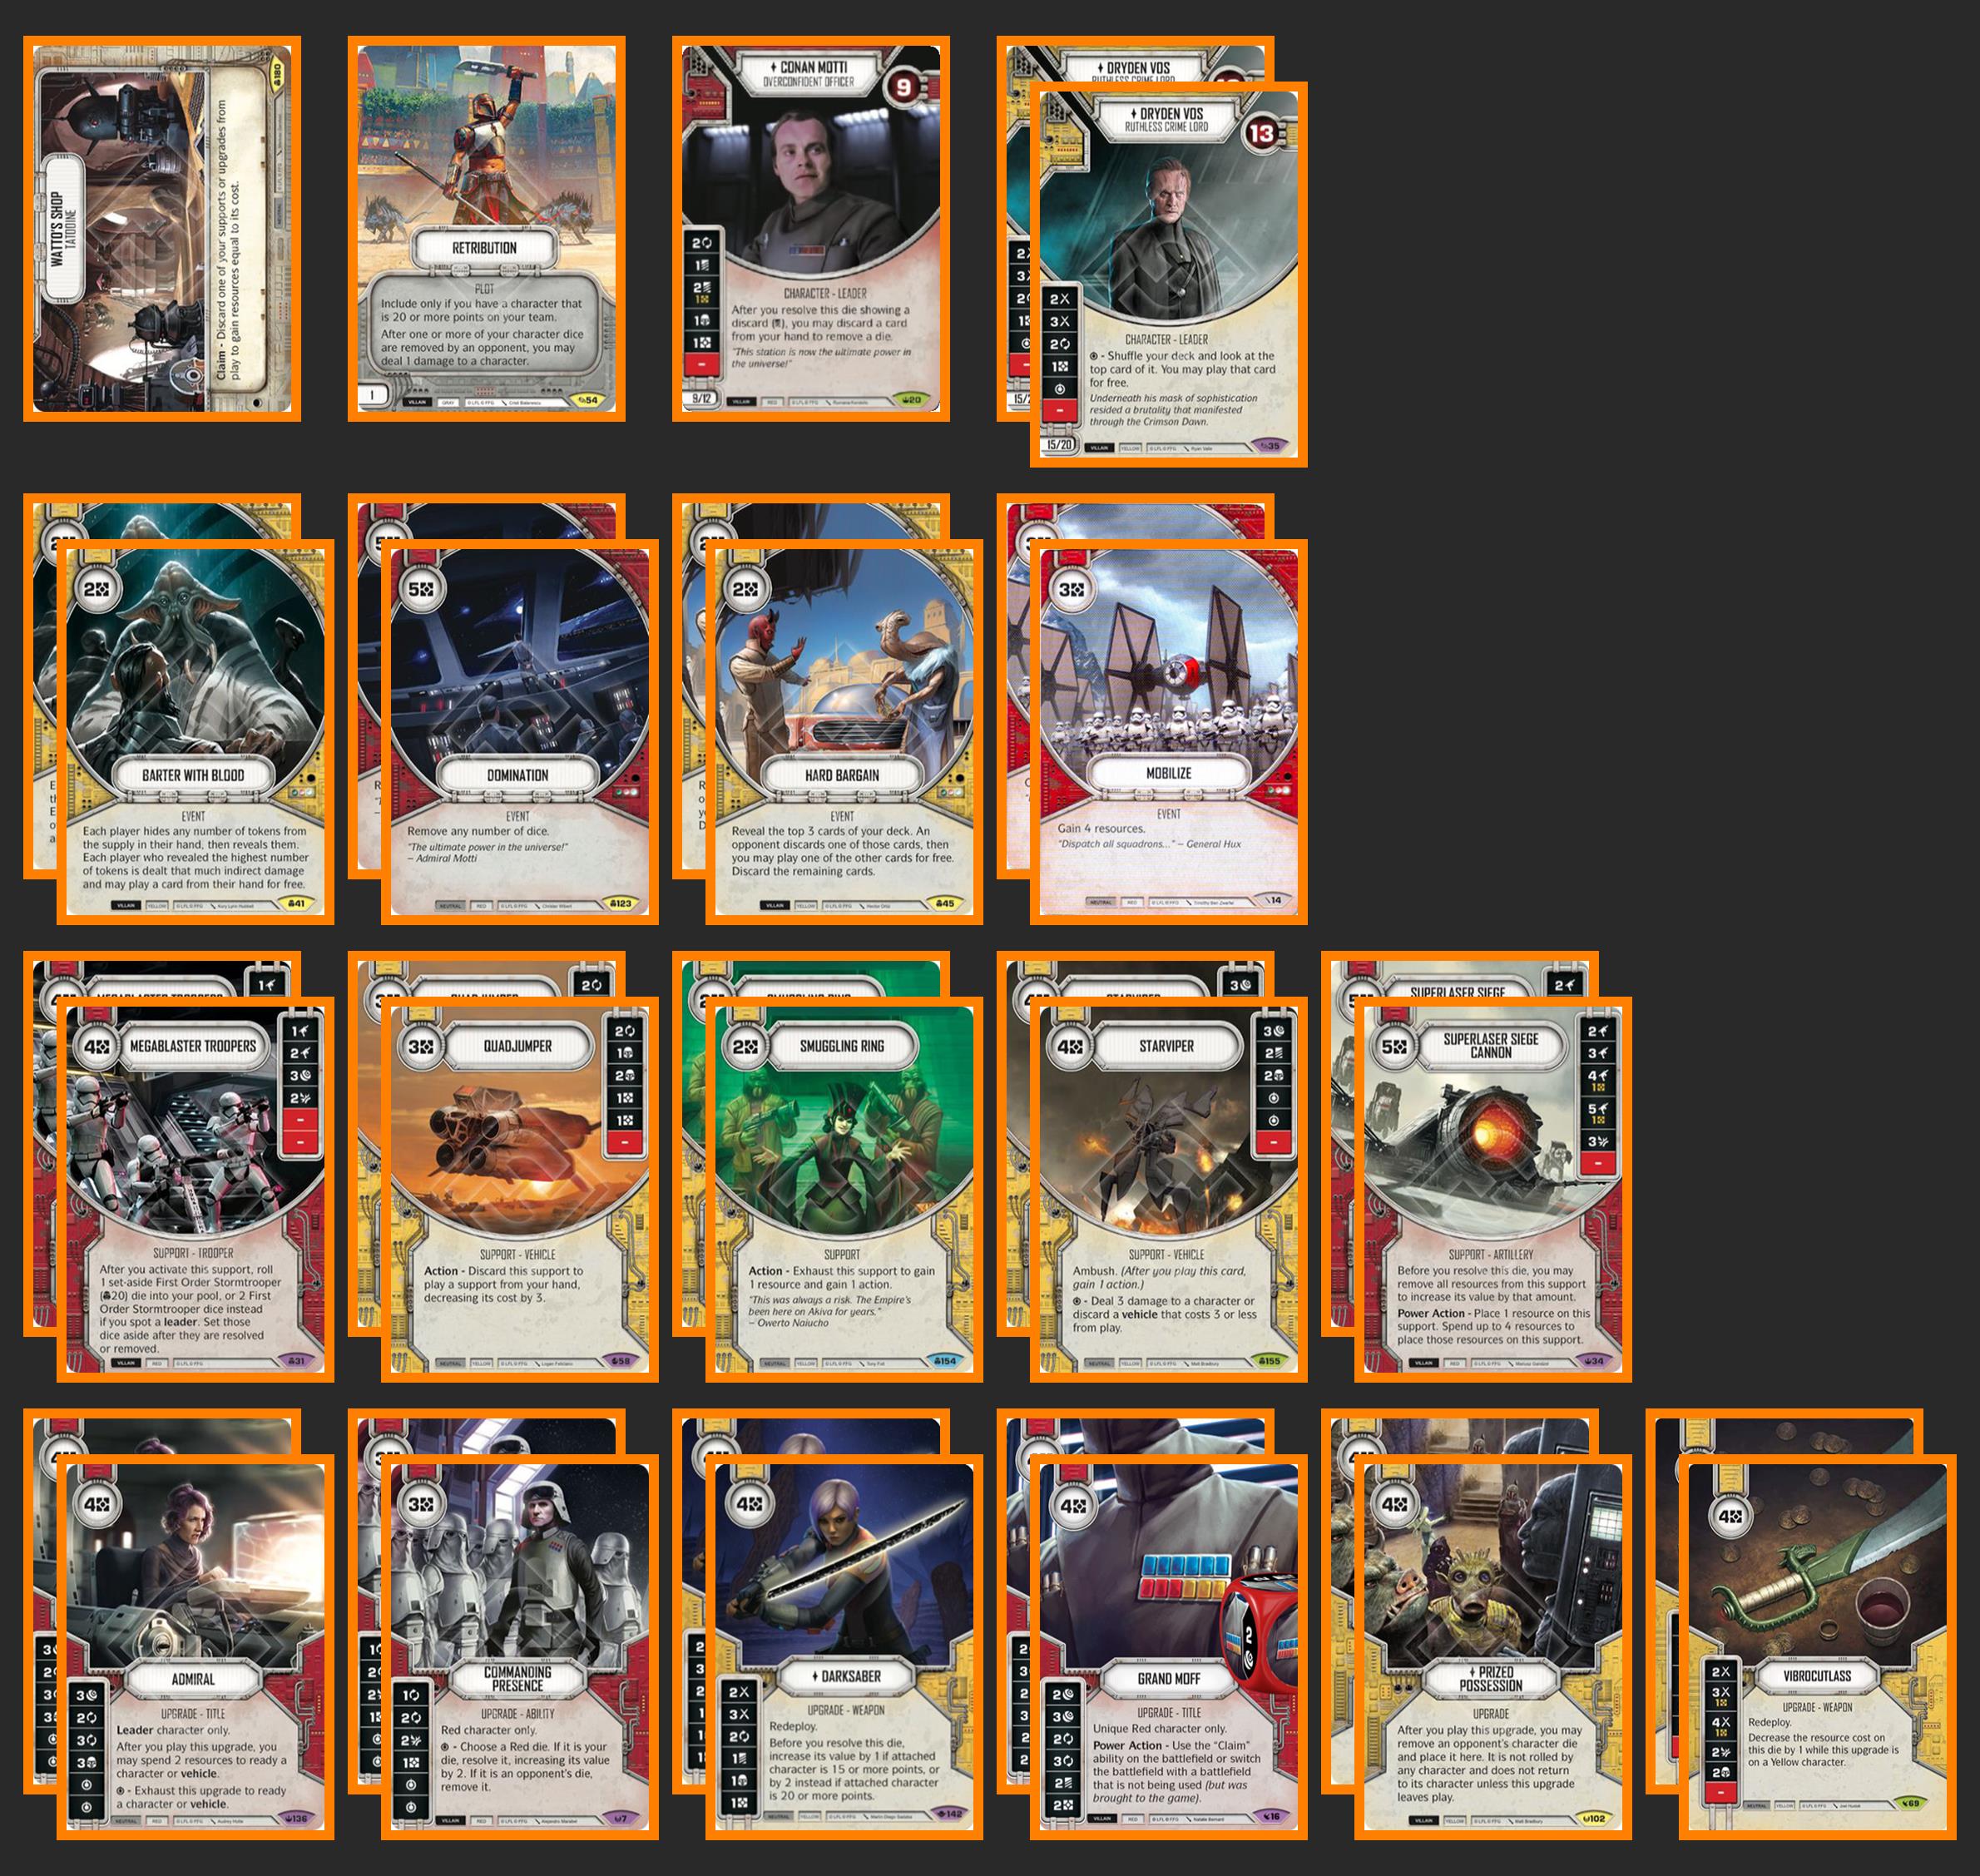
- Image - Creates a jpg-image that contains the images of the cards arranged by card type.
When exporting the deck as a jpg-image Destiny Buddy allows the user to change the size of the produced image. The actual size of the image is dependant on how many different types of cards there is in the open deck and how many different cards of each type there is in the deck. It is also possible to change the sleeve color (the border color of cards) and the background color by clicking the colored square and choosing a new color. The produced image is located in the Outputs-folder.
History
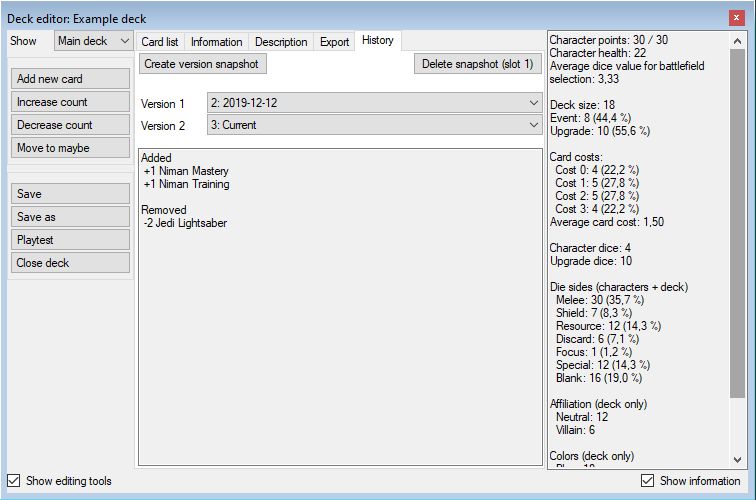
History tab contains tools for keeping track of the development of the deck. Create snapshot -button saves the current maindeck so it can be compared to other iterations of the deck in the future.
Use the two dropdown-menus for selecting which snapshots you want to compare. By default the previous snapshot is chosen in the slot 1 and the current decklist in the slot 2. It is assumed that the older snapshot is selected in the slot 1.
The Delete snapshot -button can be used to delete the snapshot that is selected in the slot 1.
Printable card creator
Printable card creator can be used to make a pdf that contains cards with some text. Mainly it is intended for printing cards that contain your deck's contents so you can cut the card and carry it along your deck.

If you want to print more than one card just click the Add card -button and export each of the decks you want to print to each cardslot.
Deck testing
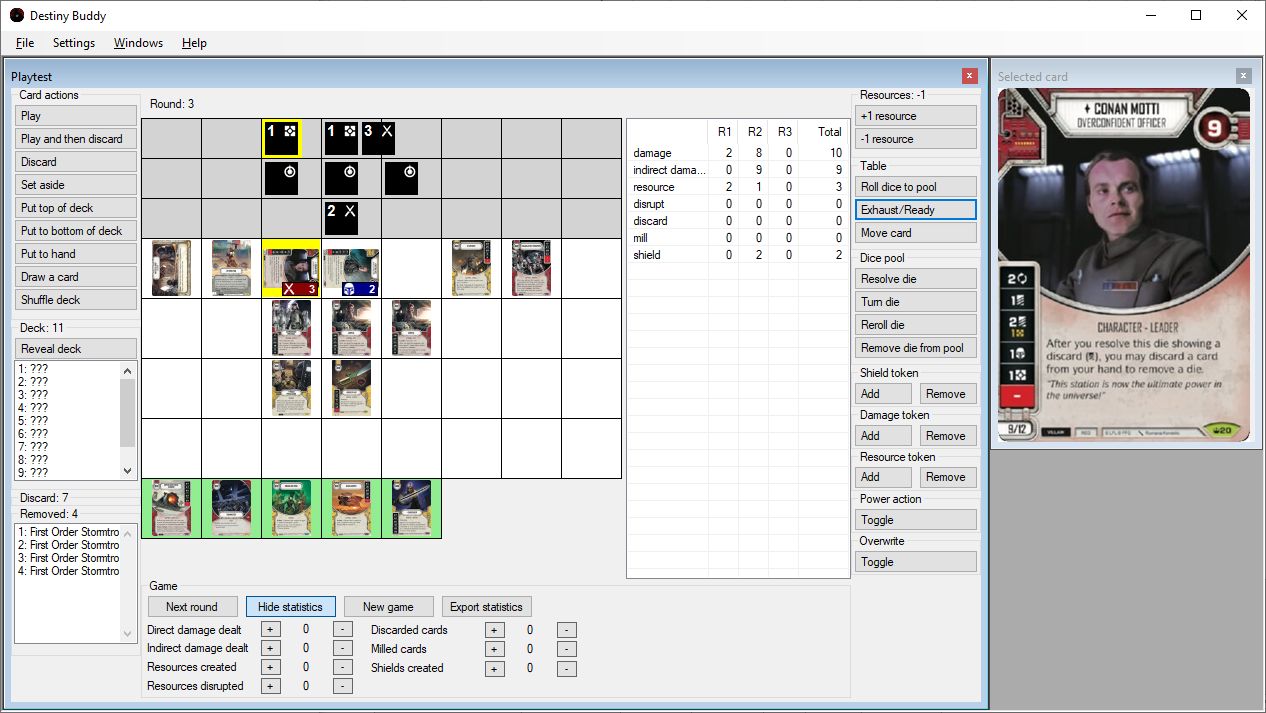
Playtesting -window allows you to do some simple solitaire-type of playtesting of a deck. There is no opponent and it is up to you to make sure you follow the rules of the game. Destiny Buddy can keep track of certain parameters on the performance of your deck (like how much damage you've dealth, how many resources you've created, etc) and it can keep track of the statistics across multiple playruns. It is recommended to play until the end of certain round and to not start new games until that. That way it is possible to get comparable results between decks and how they performed on average on a round. The results are exported into a pdf-file.
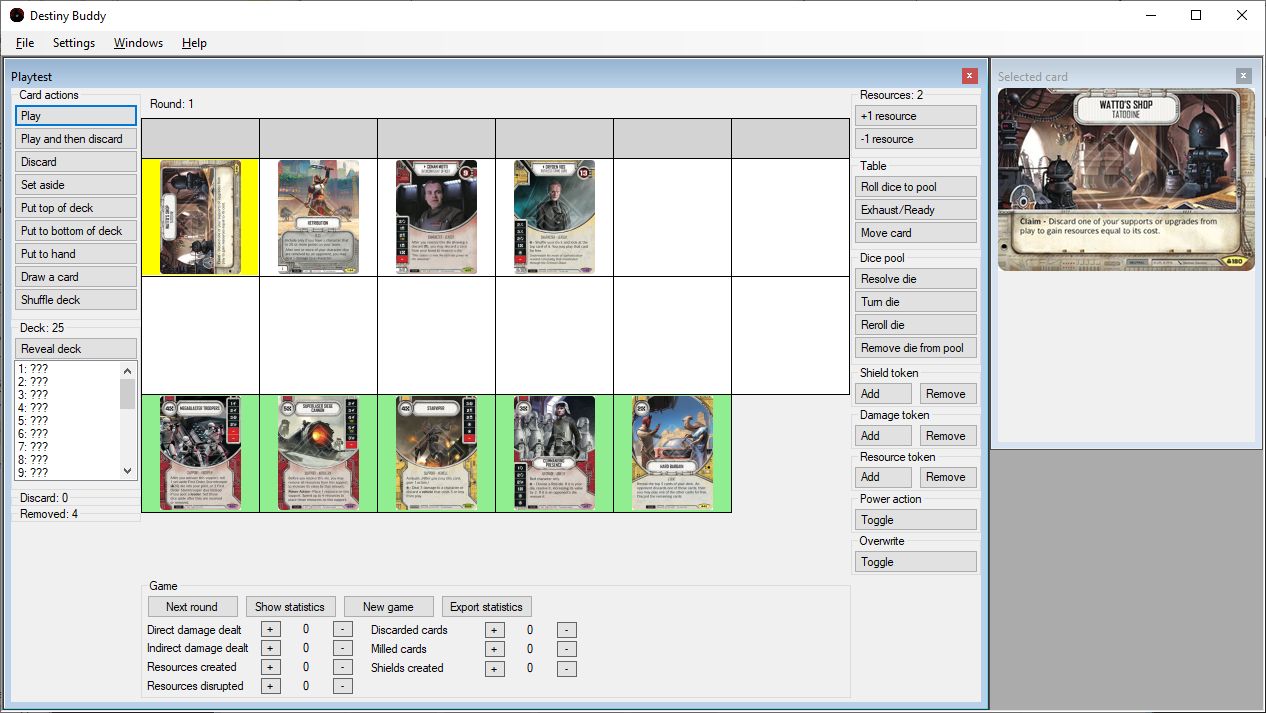
The play area is located in the center of the playtesting window. The playing area is divided into three sections. The gray section is the dice pool and all rolled dice are shown in it. The white section is for the cards that are on the table. The green section is for the hand cards. The currently selected card is shown with a yellow background.
The left side holds buttons for performing actions related on cards on your hand, deck, discard pile or outside of the game (set aside -zone of the deck). The right side contains commands to add or reduce your resources, managing the cards in the play area or dice in the dice pool and the buttons for adding tokens on the cards.
The buttons on the bottom are for managing the game statistics. Next round button automatically readies all your characters, removes power action or overwrite tokens and draws cards until you have 5 cards in hand. It also progresses the statistics recording to the next round. The plus and minus buttons can be used to manually alter the statistics for the current round. The statistics buttons shows the statistics for the current game. The only way to see the summary for all the decktesting games is to export the statistics into a pdf-file.
When a new playtesting game is started the battlefield, plot and characters are placed on the first row in the play area. The deck is then shuffled and you are dealt 5 cards. To mulligan your starting cards select them in your hand and put them on top of your deck. After that shuffle the deck and draw cards until you have 5 cards in hand.
Play -button plays the card selected in either hand, discard pile, removed -list or card browser. The card is played in the play-area where it can be moved clicking a new position while the Move card -button is highlighted. When a card is played it's resource cost is reduced from your resources (displayed on top of the right side). Play and then discard is similar to the play -button but the played card ends on top of the discard pile. This is handy when playing events for example.
Trades
Destiny Buddy can hold the information about your trades to make it easier when ordering cards online. For example when the user makes a purchase they can create a trade in Destiny Buddy where they list all the cards that should be in the shipment. While the trade is left open the card browser can display how many cards are in the open trades. This can be used to avoid ordering the same cards from multiple sellers by accident. When the shipment arrives the user can finalize the trade and then the cards listed in the trade's "get"-list are added to the owned cards and reduced from the want-to-buy cards. Similarly the cards in the "give"-list are reduced from the owned and want-to-sell lists.
To create a trade the user has to first add a trade partner (in case that parner is not already added) and then create the trade where Destiny Buddy will ask who is the trading done with. Once that is done the user can add cards to the both get- and give-lists. When the cards have exchanged hands the user should finalize the trade to add/remove the cards to/from their inventory.
The trade window allows the user to select if generic or buy/sell values are used when showing the card values. The values are not stored in the trade so they always show what the user has currently set as the cards' values. (So old trades might have been showing different values at the date of the trade happening.)

Tradelist comparison
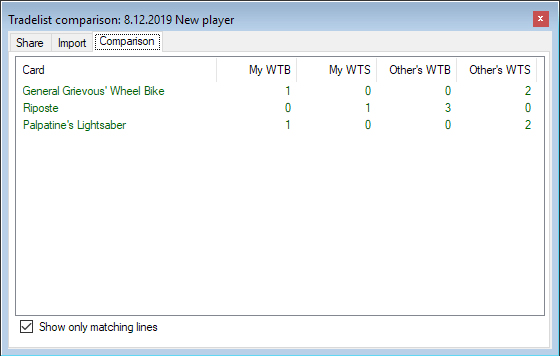
Destiny Buddy allows the users to create tradelists that can be compared with each other. Destiny Buddy will then highlight the cards that match the cards they have marked as want-to-buy or want-to-sell.
To make a tradelist type your name in the textbox under the share-tab. Then click "copy to clipboard" and paste the copied text into a textfile you are going to share with someone. When it is not easy to share files with someone one can use services like pastebin.com to share the tradelist.
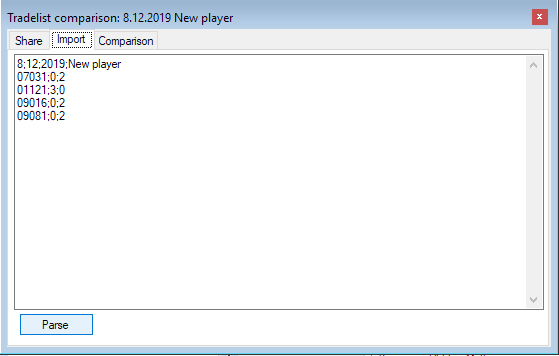
If someone shares a tradelist it can be viewed when the shared text is copied into the large textbox under the Import-tab. After you have pasted the text into the textbox click Parse-button and if everything worked out you will be taken to the Comparison-tab where all the matching cards are listed.
Draft pack generator
Destiny Buddy can be used to create custom draft events with the random draft generator -tool. The tool generates some random "booster packs" that can be used in casual draft events. The tool allows various settings to be tweaked with based on your playgroup's preferences. The intend of this tool is to allow you to take benefit of your whole collection in a cube-like fashion. It can also allow you to play sealed/draft games with your friends without the need to purchase new boosters.
Rarities in each pack -section allows the user to define how many of each rarity should each pack contain. By default each pack contains 1 rare, 1 uncommon and 3 common cards with 16% possibility of the rare card being upgraded into a legendary. Rounding issues aside this is fairly close to the distribution in normal Star Wars Destiny boosters (which on average contain 1 legendary in 6 packs). If you want to increase the power level of the drafted decks it is possible to increase the amount and rarity of cards in each pack.
Note: Cards with starter rarity cannot appear in the generated boosters.
Duplicate settings can be used to set the limit of how many copies of each card can be included in all of the packs.
Additional cards in each pack can be used to add characters to the booster packs. By default this is 0 but it might be good idea to add characters to the packs to increase the variety of the drafts. Anyone who has drafted in Star Wars Destiny probably has noticed how usually 2 characters out of 3 are from the draft sets. This is caused simply because under normal conditions there is very few characters to choose from when making the team.
If "use only owned cards" -option is checked the generated draft won't contain any cards that you don't own.
"Use banlist" -option allows you to make a list of cards that are banned from the generated draft. Cards that are simply too powerful or weak can be added to this list to improve the play experience.
"Balance colors" -option makes Destiny Buddy to balance the colors when picking up the cards. Colors are not balanced by card type though so it is possible that the packs have very few blue characters compared to yellow or red while it then has more blue events than the other colors.
"Allowed sets" -list makes it possible to pinpoint the draft into a specific set or sets.
When "Generate packs" -button is pressed Destiny Buddy will generate the packs and open a window where the user can browser through all the packs. Various statistics can also be seen and it is possible to copy the draft into clipboard arranged by the packs or by the sets the cards are from. It is also possible to create a pdf-file that will contain all the information about the draft.
As gathering all the cards for the draft is a lot of work I'd advice printing the pdf and using it while gathering and sorting the cards into the packs.
Some considerations:
- If you play yourself it is worth it to make more packs than what is needed for the amount of players joining. This way you can't be 100% sure what cards will be available in the packs.
- The pdf-file containing the cardlists can be made public for your playgroup before the event takes place. This way everyone are on the equal footing when it comes to the contents of the packs.
Custom set/card creation
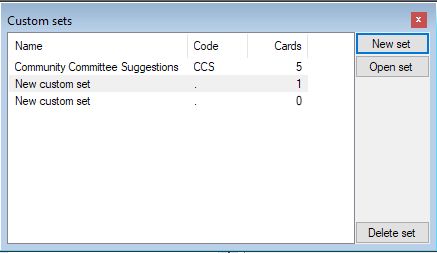
As a new feature in Destiny Buddy 1.09 it is now possible to create new sets and cards. The way to do this is to open the custom set creation -window. This window allows creating, opening and deleting custom set projets. Once the New set -button is pressed Destiny Buddy will create a new set. In practice a folder for the new project is created in the Data/CustomSetProjects. These project folders must alway contain a project.txt -file which contains all the information about the project and cards included in it.
Please note that when the Delete set -button is pressed all the files in the folder containing that project's files are deleted. DO NOT put anything important in the folders that contain custom set projects for this reason as it might lead you to lose those files permanently!
Once you open a custom set project the set/card editor is shown and you may edit all the properties of the set.
- Name - The name of the set.
- Identifier - This is used as the setcode which is used when determining all the card ids (the format is id001, id002, id003, etc). Try to keep this short. The identifier is also used when determining the filenames for the card images so only symbols that can be used in filenames should be used.
- Designer - Put your own name or nickname here. The designer is included in the deployed projects cards.txt file so it is possible to find out who should be credited for the set.
- Version - In case you make revisions of the set it is possible to add a running number in this field. The version information is not used anywhere though.
- Icon - The icon of the set. If the icon is not added for the custom set then the identifier is used instead of it when creating the card images or creating die faces.
The card editor is fairly straightforward to use but there is some fields which require a specific formatting to work properly.
- Subtypes - This field can contain multiple values and the different values should be separated with a comma (,). For example if you are creating a character that is both a Leader and a Sith type "Leader,Sith" into this field.
- Points - This field can contain values for both single die version and elite version. If the card has only single die point cost type the point cost into this field. If it can be played as elite type normal version point cost and the elite version point cost separated by a slash symbol (/). For example "9/12" would mean that a single die version would cost 9 teambuilding points and a two die version would cost 12.
- Text - This field contains the rules text part of the card. It pretty much works as expected except the die side icons can be used by typing {melee}, {ranged}, {indirect}, {shield}, {resource}, {disrupt}, {discard}, {focus}, {special} or {blank}. Some words can also be made bold by writing those words in the middle of two asterisk symbols. For example "*bold* *text*" would end up showing words bold and text in bold.
- Die sides - This field can be used to type in all the die sides of the card. The different die sides are separated by a comma (,) and the format is as follows: + (if it is a modifier side) VALUE (X or a number) EFFECT (MD, RD, etc) COST (resource cost of resolving the side in a number format). Below this field there is a form that can also be used to determine the die sides of the card. Note that the Die sides -field is updated to match the form below it. Example: "1MD,+2MD,2MD1,1F,1R,-" would mean that the card has a die that has the following sides: 1 melee damage, +2 melee damage (modifier), 2 melee damage for 1 resource, 1 focus, 1 resource and a blank.
- (Art) Image - This field contains the filename of the art that is used in the card. It's scale and position can be altered with the form below it. When an image file is selected a copy of it is created into the custom set project's folder.
Automatic and manual backups of custom set projects.
As the automatic backups are created every time Destiny Buddy is started (if enabled in the settings) only the project.txt file is included in the backup file. A big custom set project might contain a lot of images that are used as the card's art so the backup file might end up huge if all of them would be included in the automatically created backups. Because of this the ART IMAGES ARE ONLY INCLUDED IN THE BACKUPS WHEN A MANUAL BACKUP IS CREATED IN THE SETTINGS -WINDOW. If you're working on a big custom set project please create manual backups when you finish working in order to include the art images as well.
Releasing the custom sets
When you are done with the custom set you can release it by navigating to the Release -tab and selecting a name for the zip-file that will contain the custom set. Once a name has been chosen and the Release -button is pressed Destiny Buddy will generate the card images and a cards.txt file which are all packaged in the zip-file. This zip-file is then placed on Data\CustomSets -folder. This zip-file can be uploaded to your own website or some file hosting service where other people can download it. The zip-file will contain the information about all the cards in text-format (in the cards.txt file) and all the card images as jpg files. People that use Destiny Buddy can place this zip-file in their Data\CustomSets -folder. When Destiny Buddy is started it will search this folder for zip-files, read them and show the cards in the similar fashion as the official SWD cards. Please note that you might have to check the set in the filter-window (tab 5) to make them show up in the card browser.

Copyright © 2019- Ati Makkonen